Contents
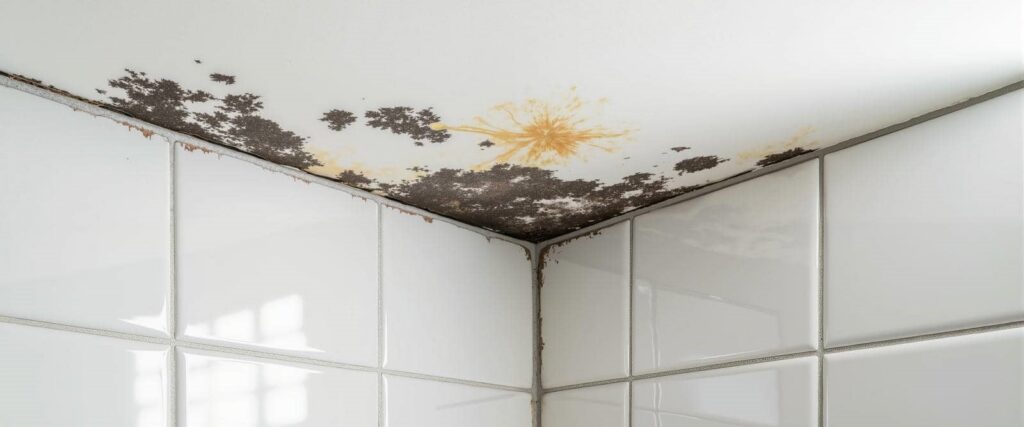
It’s ironic how a ceiling leak can quickly turn into a mold issue if not addressed promptly. You’ll need to evaluate the damage right away, checking for moisture and discoloration. But before you jump into cleanup, there are essential safety precautions to contemplate. Knowing how to handle this situation can save you time and health down the line. So, what steps should you take to ensure effective remediation?
Key Takeaways
- Assess and document the damage by checking for moisture, discoloration, and using a moisture meter to identify issues.
- Wear protective gear, ensure proper ventilation, and isolate the affected area to prevent mold spread during cleanup.
- Remove affected materials, seal them in heavy-duty plastic bags, and dispose of them according to local hazardous waste regulations.
- Clean affected surfaces with appropriate disinfectants, thoroughly rinse, and dry to prevent mold regrowth.
- Implement moisture control measures and regularly inspect for leaks to prevent future mold growth.
Assessing the Damage
After a ceiling leak, it’s essential to assess the damage promptly to prevent mold growth.
Begin by examining the affected area, checking for visible signs of moisture, discoloration, or peeling paint. Use a moisture meter to gauge the humidity levels in the material; anything above 15% indicates a problem.
Identify mold types that may have started to develop, such as black mold or white mold, as different types may require different remediation approaches. Pay close attention to hidden spaces, like behind drywall or in attic insulation, where moisture can linger unnoticed.
Document your findings thoroughly during the damage assessment. Take photos and note the extent of damage, as this information will be vital for any insurance claims or remediation plans.
Safety Precautions
Before you start addressing mold issues, you need to prioritize your safety.
Wear protective gear like gloves, masks, and goggles to shield yourself from spores.
Additionally, ensure proper ventilation and use containment methods to prevent mold from spreading further while you work.
Protective Gear Essentials
When dealing with mold after a ceiling leak, protective gear is essential to confirm your safety and health.
Start by wearing high-quality protective gloves, preferably made of nitrile or latex, to prevent skin contact with mold spores and cleaning agents.
Next, don a respirator mask equipped with HEPA filters; this will protect your lungs from inhaling harmful spores and toxins. Ascertain the mask fits snugly to maximize its effectiveness.
Additionally, consider wearing safety goggles to shield your eyes from irritation caused by mold or cleaning solutions.
Remember, taking these precautions safeguards your health and fosters a sense of belonging in a community that values safety and well-being.
Equip yourself properly, and tackle mold removal with confidence.
Ventilation Importance
Wearing protective gear is just the first step in addressing mold after a ceiling leak; ensuring adequate ventilation is equally important.
Proper air circulation reduces moisture levels, curbing mold growth. Here are some effective ventilation techniques you can implement:
Open Windows: This promotes natural airflow and helps reduce humidity.
Use Fans: Positioning fans to direct air can enhance circulation and expedite drying.
Dehumidifiers: These devices help maintain ideal moisture levels, especially in enclosed spaces.
HVAC Systems: Verify your heating, ventilation, and air conditioning systems are functioning properly to improve air exchange.
Containment Methods
To effectively manage mold after a ceiling leak, you need to implement containment methods that prevent spores from spreading throughout your home.
Start by sealing off the affected area using plastic sheeting. This is one of the most effective sealing methods, as it creates a barrier between contaminated and clean spaces. Use duct tape to secure the edges tightly.
Additionally, consider using airlocks or negative pressure systems if the leak has notably affected air quality. Employ mold containment techniques, such as using HEPA-filtered air purifiers to capture airborne spores.
Always wear protective gear, including gloves and masks, to safeguard yourself during the cleanup process. By taking these precautions, you’ll help ensure that mold doesn’t spread further in your living environment.
Removing Affected Materials
Begin by carefully removing any materials affected by mold, such as drywall, insulation, or carpeting. This step is essential for effective mold removal and ensures that you prevent further contamination.
Follow this process for material disposal:
Wear Protective Gear: Equip yourself with gloves, goggles, and a mask to avoid exposure to mold spores.
Seal Materials: Place the removed materials in heavy-duty plastic bags, sealing them tightly to contain any spores.
Dispose Properly: Follow local regulations for hazardous waste disposal. Don’t just toss them in regular trash.
Document the Damage: Take photos of the affected areas and materials for insurance purposes.
Cleaning and Disinfecting
Before you start cleaning, gather all necessary supplies, including gloves, masks, and appropriate cleaning solutions.
Make sure to follow safety precautions to protect yourself from mold spores.
Once you’re ready, apply disinfectant solutions to all affected surfaces to effectively eliminate the mold.
Gather Cleaning Supplies
Gathering the right cleaning supplies is essential for effectively tackling mold after a ceiling leak.
Different mold types require specific cleaning solutions, so you’ll want to be prepared. Here’s a quick list of must-have supplies:
Protective Gear: Wear gloves, goggles, and a mask to shield yourself from mold spores.
Cleaning Solutions: Use a mixture of water and detergent, or a commercial mold cleaner designed for the type of mold you’re dealing with.
Scrub Brushes and Sponges: These will help you scrub surfaces to remove mold thoroughly.
Buckets and Trash Bags: For disposing of contaminated materials and collecting cleaning solutions.
With these supplies on hand, you’ll be well-equipped to tackle the mold problem effectively.
Follow Safety Precautions
Once you’ve assembled your cleaning supplies, it’s important to prioritize safety while tackling mold cleanup.
Start by wearing protective gear, including gloves, goggles, and a mask rated for mold health, to minimize your exposure to spores.
Verify the area is well-ventilated by opening windows and using fans.
Follow safety guidelines by sealing off the affected space to prevent cross-contamination.
If you’re dealing with significant mold growth, consider using a containment method, like plastic sheeting, to keep spores from spreading.
Make sure to keep children and pets away from the area during cleanup.
By taking these precautions, you protect yourself and foster a healthier environment for everyone in your home.
Your commitment to safety will make a difference.
Apply Disinfectant Solutions
Begin by applying a suitable disinfectant solution to the affected areas, as this is essential for effectively combating mold.
Choosing the right disinfectant types is vital; consider options like hydrogen peroxide, vinegar, or commercial mold removers.
Follow these application techniques for best results:
Prepare the Area: Remove any furniture and cover surfaces to avoid contamination.
Apply the Disinfectant: Use a spray bottle or sponge to evenly coat the moldy surface.
Allow Time to Work: Let the solution sit for at least 10-15 minutes to penetrate the mold.
Rinse and Dry: Wipe down the surface with clean water and dry thoroughly to prevent regrowth.
Preventing Future Mold Growth
Although dealing with mold can be challenging, preventing future growth is essential to maintaining a healthy home. Start by using mold resistant materials in areas prone to moisture, such as bathrooms and kitchens. These materials help inhibit mold spores from settling and thriving.
Next, implement effective humidity control measures. Aim to keep indoor humidity levels below 60% by using dehumidifiers, especially in damp areas. Regularly inspect and maintain your HVAC system to ensure proper airflow and moisture removal.
Additionally, verify your home is well-ventilated; open windows when weather permits and consider installing exhaust fans in high-humidity areas. Inspect for leaks regularly, and address any plumbing issues promptly.
When to Call a Professional
When should you consider calling a professional for mold remediation? While you may feel capable of handling small mold patches, specific situations necessitate expert intervention.
Here are four key indicators:
Extensive Mold Growth: If mold covers more than 10 square feet, a professional inspection is vital.
Persistent Odors: Lingering musty smells could indicate hidden mold, warranting a thorough mold inspection.
Health Concerns: If you or anyone in your home experiences respiratory issues or allergic reactions, it’s important to seek professional remediation.
Water Damage: Post-leak, if you can’t fully dry the area or if mold reappears, a specialist’s expertise is necessary.
Professional remediation ensures thorough cleaning and helps prevent future outbreaks.
Frequently Asked Questions
Can Mold Return After Cleaning It Myself?
Yes, mold can return after cleaning it yourself. For effective mold prevention, consider proper ventilation and moisture control. Professional remediation ensures thorough removal, reducing the chance of recurrence and fostering a healthier living environment.
Is All Mold Harmful to My Health?
Not all mold types are harmful, but some can cause significant health effects, especially in sensitive individuals. You should identify the specific mold and assess its potential impact on your health for proper management.
How Long Does It Take to Grow Back?
When it rains, it pours—mold growth can reappear within 24 to 48 hours if conditions are right. To prevent it, ensure proper ventilation, fix leaks promptly, and maintain low humidity levels in your home.
Will Insurance Cover Mold Damage From a Leak?
Your insurance might cover mold damage if your leak policies include mold coverage. Check your policy details for specific provisions, as coverage can vary widely based on the insurer and the circumstances surrounding the leak.
Can I Paint Over Moldy Surfaces?
You can’t just paint over moldy surfaces. First, ensure proper mold removal and follow thorough paint preparation steps. This ensures the paint adheres well and prevents future mold growth, keeping your space safe and beautiful.
Conclusion
Just like a gardener tending to a wilted plant, you must nurture your space back to health after a ceiling leak. Take swift action to assess, remove, and cleanse the affected area, ensuring you eliminate any lingering threats. By implementing moisture control, you’re cultivating a robust environment, safeguarding against future mold growth. If the stubborn spores persist, don’t hesitate to enlist a professional; even the most skilled gardener sometimes needs a helping hand to restore their garden’s vibrancy.